Sunday, December 22, 2013

Coconut Rice Pudding

This is a versatile dish that can be used as a side dish or a dessert.  It was the perfect "Who-pudding" for our Grinch feast and will definitely find its way onto many menu's in the future.

1 cup of cooked rice - use what you have on hand 
1 cup of coconut milk (not light...full fat baby)
1/2 cups of heavy cream 
8 Tbsp sugar
1 tsp vanilla
1/4 c pomegranate seeds
A few dashes of cinnamon

To the cooked rice, stir in the cream and the sugar.  Add the vanilla and mix well.  Top with pomegranate seeds and cinnamon.  Serve warm.  Will thicken as it cools.  

Southwest Frito Dip

This is a perfect appetizer for a potluck or even the big game. It seems fresh and healthy, and it probably is...but the ranch sort of negates any health factor.  It's a nice variation from your typical cracker/tortilla chip and dips that are usually the go-to's.  This was definitely a crowd pleaser!


1 can drained white corn - frozen will work as well
1 can drained and rinsed black beans
1 pkg grape tomatoes diced
2 avocados diced
1 bunch green onions
1/2 packet taco seasoning
1 tsp granulated garlic
1 bunch cilantro; chopped
 Hidden Valley Spicy Ranch-to desired taste and consistency - I used 1/2 a bottle and it was lightly coated.


Mix all ingredients together, refrigerate, and serve with Fritos.

Kale Salad

I have never really embraced the fact that kale is the new spinach.  It's bitter, it's tough, and it's really hard to work with.  You have to wash, destem, chop, and it's still not that tasty.  Well, this salad totally changed my whole perspective.  Granted, it's still harder to work with than your average leafy green, the flavors are robust and hearty with the fresh pops to sweet from the pomegranates...this salad is pretty much the whole package.  It can also be made and eaten over a series of days.  Add a chicken breast and you have yourself a delicious lunch!!


3 tbsp white wine vinegar
2 tbsp finely minced shallot
1 tbsp honey
1 tbsp EVOO
1 tsp salt
1/2 tsp pepper
2 bunches kale, destem and chop into bite sized pieces
1/2 c pomegranate seeds
1/4 c shredded parmesan cheese
2 tbsp toasted pine nuts

Whisk together the vinegar, shallot, honey, olive oil, salt, and pepper.  Toss kale in dressing to coat evenly.  The dressing will seem light, but the kale will wilt down to 1/2 its volume. 

Transfer kale to a lidded container and refrigerate overnight.  To serve put kale into a bowl and top with pomegranate seeds, parmesan cheese, and pine nuts.  Enjoy!!  Serves 8

Monday, December 2, 2013

Loaded Baked Potato and Chicken Casserole

While this dish may look like a lot of steps, it only took me about 30 minutes from the time I started to the time it was in the oven.  I had everything but the green onions on hand (luckily my neighbor bailed me out), and it was super delicious.  It was hard not to lick the plate clean!!

3-4 Medium russet potatoes, baked (I cooked mine in the microwave) and chopped into 1 inch cubes
1 lb Chicken - boneless skinless (I used tenders), cooked and sliced
6 Green onions
6 slices bacon cooked crisp and chopped
2 cups shredded cheddar cheese
1/2 cup heavy cream
1 tsp salt
1 tsp pepper
1 tsp garlic powder


Preheat oven to 425 degrees.  Layer 1/2 of the potatoes, chicken, bacon, green onions, and cheddar cheese into the bottom of a 9x13 pan.  Mix together the cream, salt, pepper, and garlic and pour half over the top the dish.  Layer the remaining 1/2 of all the ingredients and top with the remaining cream. 

Put into the oven and bake for about 30 minutes or until the cheese is golden brown and the cream is a thick sauce"ish" texture. 

ENJOY!!  Yum...so good!!

Thursday, September 26, 2013

Blue Cheese Bacon Sliders

These sliders are compliments of my fabulous sister-in-law Brandi!!  With an extra shout out to Our Best Bites.  These sliders are creamy, salty, crunchy, and satisfy just about every area on the tongue!!  Despite what the recipe may show, it is pretty easy to throw together, and you can adjust to serve just your family, or even a crowd.  SO GOOD!!!

Blue Cheese Spread
1/2 c Mayo
1/4 tsp Salt
1/4 tsp pepper
1 tbsp. Red wine vinegar
1 clove garlic finely pressed
1/4 c crumbled blue cheese

Mix all ingredients together and store in the fridge until you are ready to use.


BBQ Bacon Sliders
1 1/2 lbs lean ground beef
1/2 c BBQ sauce
1/2 tsp salt
1/4 tsp pepper
8-10 white rolls, or Hawaiian sweet rolls if your local grocery store carries them (I live in Japan so I use frozen Rhodes rolls and it turns out great!)
Blue cheese spread
8-10 crisp lettuce leaves
8-10 slices bacon, cooked crisp
Crispy shoe string onions (slice onions thin, toss in flour, and fry in hot veggie oil: optional)

Heat a grill pan.  Mix the beef, BBQ sauce, salt and pepper, and portion out into 8-10 patties (same size as the buns)

Cook the burgers on the grill pan until cooked through.  While burgers are cooking, brush with BBQ sauce. 

To assemble burgers, lightly spread the buns with the blue cheese spread on both sides and layer with a burger patty, a piece of lettuce, a strip of bacon and extra BBQ sauce if desired.  You can add the crispy onions if you decided to make them too :)

Enjoy!!  Serves 4.

Fajitas

These fajitas are just like in the restaurant...besides the prep, cooking, and the cleanup...but hey, you don't have to tip and it's a fraction of the cost.  The DIY seasoning mix is better than any packet we have ever tried and I had all the ingredients on hand.  No more artificial colors, preservatives, or gunk for this family!  This recipe can be adapted to use seafood, chicken, or steak, just use whatever you have on hand.  Make sure if you are using chicken or steak to cook through before you add the veggies. 

DIY Seasoning:
1 tbsp. Cornstarch
2 tsp chili powder
1 tsp salt
1 tsp paprika
1 tsp sugar
3/4 tsp crushed chicken bouillon cube
1/2 tsp onion powder
1/4 tsp garlic powder
1/4 tsp cayenne pepper (adjust according to desired spice level)
1/4 tsp cumin

Mix all ingredients together and store leftovers in an air tight container.  This recipe in enough for 2 fajita meals :)

2 tbsp. Olive Oil
1 Yellow onion sliced
1 Red pepper sliced
1 Green pepper sliced
1 Large tomato chopped
3 tbsp. Fajita seasoning
1 lb shrimp, chicken, or steak


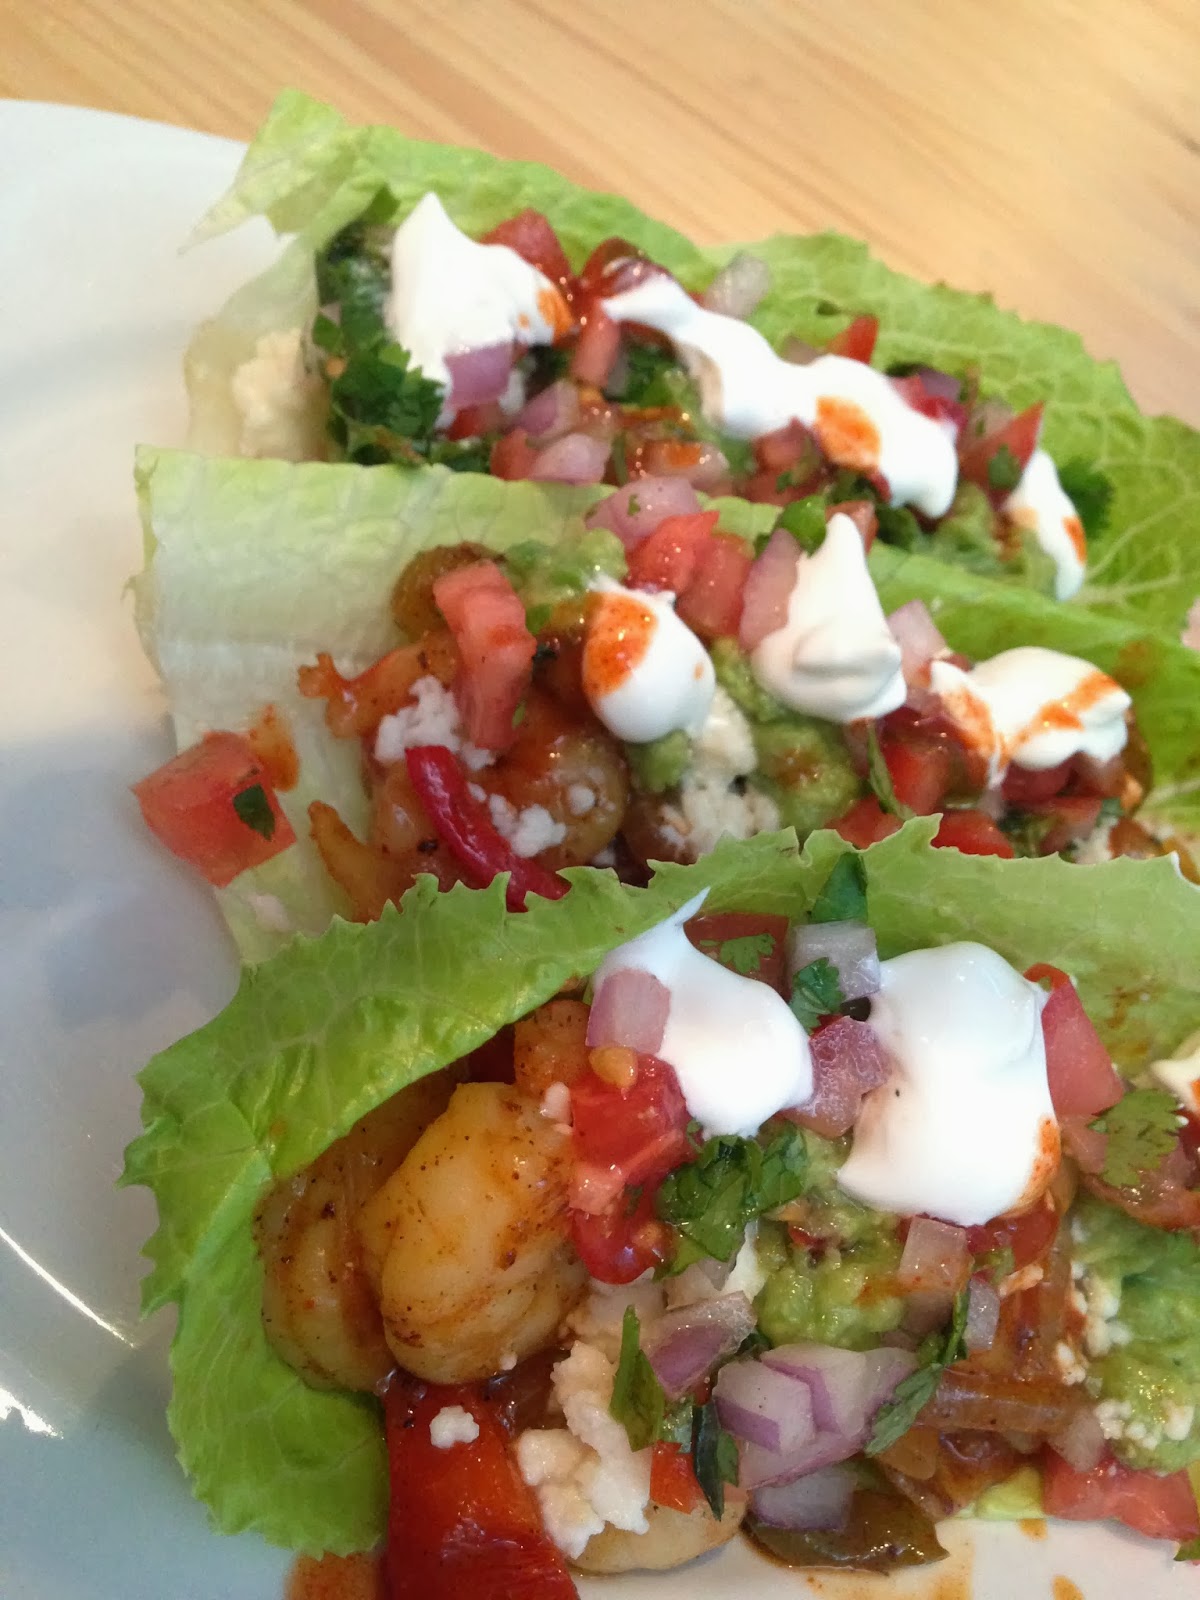
I like skipping the tortilla and just eating the fajitas in a romaine lettuce cup!!
In a cast iron skillet over medium heat, heat your olive oil.  Make sure it is searing hot before you add your chicken or steak (if you are doing shrimp then add it after the veggies).  Cook meat for 3-4 minutes per side or until the meat is cooked through.  You want a char on the meat, so resist the urge to check it or flip it prematurely.  You could also cook the meat on the grill.

Once the meat is cooked, remove it and place on a cutting board.  Tent with foil and let it rest.  Add the onions and peppers to the hot pan and let them cook without stirring too much.  Again, you want the veggies to char and that won't happen if you stir them around too often.  After a minute or two, add 1 tbsp. of seasoning and toss the veggies to coat them. 

At this point, slice your chicken or steak into fajita size pieces and add back into the skillet.  If you are using shrimp, then add them now.  Add another 2 tbsp. seasonings as well as the chopped tomatoes.  Let it cook only until the shrimp is cooked, and then remove from the heat.  Serve immediately.

Serve with corn or flour tortillas, sour cream, queso fresco, pico de gallo, guacamole, tapatio, lettuce, and any of your other favorite toppings!!  Enjoy!!!  Serves 4

Wednesday, September 4, 2013

Banana Bread

This is one of those recipes that is so simple yet so amazingly good, that you keep thinking there has to be more to it. It's hard to mess up sweet breads like this, but this is the best of the best. There is something magic in its simple ingredients, and when I experiment with it, I always find I still like the original best!

This recipe makes 12 muffins, or one big loaf.  I like to do the muffin route because it makes for a quick grab and go breakfast that the loaf style just doesn't cater to.

1/2 c butter
1 c sugar
2 eggs
1/2 tsp salt
1/2 tsp baking soda
1 1/2 c (about 3) over ripe bananas, mashed
2 c flour
1/2 c nuts (optional...like pecans)
1 tbsp cinnamon
1 tbsp brown sugar


Cream butter, sugar & eggs. Add salt & baking soda; mix well. Beat in the bananas. Add the flour. Stir in nuts if using. Sprinkle the cinnamon and brown sugar over the top of the muffins/loaf as evenly as you can.           
 
Pour into greased muffin tins about 2/3 full, or a LARGE buttered loaf pan (mine measures 4 1/4" x 8 1/4" on the bottom, 5 1/2" x 9 1/2" on the top, 2 3/4" tall.) If pan is not big enough, it will not cook all the way in the center. If you have a smaller pan, don't use all the batter in one pan.           
 
Bake at 350 degrees F for about 45- 60 min., until toothpick inserted in the center comes out clean.

Let cool 5-10 minutes before loosening sides and inverting, letting it cool the rest of the way on a cooling rack.           
 
Great out of the oven, even better the next day, if it doesn't get eaten first! Wrap up after it cools completely to keep it moist.

Thursday, August 29, 2013

Tomato Basil Shrimp Pasta


½ lb shrinp (41-50 count)
2 tbsp Italian seasoning mix (the salad dressing seasonings)
Few splashes red wine vinegar
2 Tbsp extra virgin olive oil
2 cups chopped fresh tomatoes
2 tsp minced fresh garlic
4 Tbsp cold butter
1/2 cup fresh basil, chopped
12 oz angel hair pasta
freshly grated Parmigiano reggiano cheese, for garnish

Marinate shrimp with Italian seasonings, olive oil, and vinegar for an hour or two.  Add a couple of tablespoons of extra virgin olive oil to your skillet.  This may seem like quite a bit, but it will form the base for the sauce.  While waiting for the oil to heat up, go ahead and get your water going for the pasta. When the oil is HOT, add the shrimp. 

After the shrimp has been cooking for about 1-2 minutes, go ahead and add in the fresh tomatoes that you have chopped up.  Next, add the fresh basil that you have chopped into ribbons, the cold butter, the minced garlic, and you will probably want to add some more kosher salt and black pepper to season the sauce.  Now give it all a good stir so all those flavors will marry together.   

When your shrimp is "done," turn the sauce down on the lowest setting to keep it all warm until the pasta is cooked, which should be any minute now.  Add the cooked pasta to the pan and toss in the sauce.  Top with more fresh basil and freshly grated Parmigiana reggiano cheese.

Ahi Tuna Wonton Crisps

If you ever go fishing and catch a beautiful 20lb Ahi Tuna...MAKE THESE!!!  They are so delicious and while the picture may not look like it...very easy to make.  All the flavors combine to create an explosion of flavors and textures you just can not beat.  Just make them!!

1 c julienned pea pods (I used snow peas, but sugar snap would be great too)
1 c julienned carrots
1 c julienned jicama
1/2 c nappa cabbage
1/2 c chopped cilantro
4 tbsp mayo
1 tbsp djon mustard
2 tbsp honey
1 tbsp orange juice
1 tbsp lime juice

36 wonton wrappers
2 tbsp sesame oil
1 tbsp sesame seeds

Ahi tuna
salt and pepper
olive oil

1/4 c soy sauce
1 tbsp wasabi


Preheat oven to 350 degrees.  Very lightly brush the sesame oil onto a baking sheet.  Place wonton wrappers onto baking sheet and sprinkle with sesame seeds.  Bake for 5-8 minutes or until golden brown.  Watch them closely because they will burn very easily.

Mix together all the veggies for the cole slaw and set aside; then mix together the wet ingredients and set aside. Mix the wasabi and soy sauce together and set aside.

Generously salt and pepper the tuna.  Heat up olive oil in a skillet until it is searing hot.  Place the tuna in the oil and cook for one minute per side (adjust cooking time based on thickness of tuna).  Place tuna onto a plate and let it rest for a few minutes.

While tuna is resting, mix together the cole slaw veggies with the dressing.  Place a generous portion on top of a wonton crisp and top with a slice of tuna.  Drizzle the wasabi/soy sauce mixture over the top and sprinkle with sesame seeds.  Serve immediately!!!!

Pineapple Grilled Pork Chops

I guess in Okinawa that chicken is a more expensive meat, and pork and beef are relatively cheap.  With that in mind...just know that the balance will even out on my ratio of pork/beef to chicken recipes over the next three years.  It is about time that I broaden my horizon on the wonderful world of pork and beef, as I have kind of shyed away from them in the past.  I find them harder to cook well, and they don't soak up as much flavor as chicken.  They have also been way more expensive than chicken and when you are on a student budget...you cut costs and all costs.

Any who...this recipe was delicious, easy to cook well, and an extremely easy weeknight recipe.  I marinated these chops a few nights before (when I brought them home from the grocery store), and is the perfect balance of sweet and salty.  Next time I make this recipe I am going to try it with fresh pineapple.  We will see how it goes :)

1/4 cup soy sauce
1/4 teaspoon garlic powder
4 pork chops
1 (8 ounce) can pineapple rings, juice drained and reserved
1/4 cup brown sugar
1 pinch ground black pepper

Mix together the drained pineapple juice, brown sugar, soy sauce, and garlic powder together in a large plastic zipper bag, and smush the bag a few times with your hands to mix the marinade and dissolve the sugar. Place the pork chops into the marinade, squeeze out any air in the bag, seal it, and refrigerate overnight. Reserve the pineapple rings.
Preheat an outdoor grill for medium heat, and lightly oil the grate.

Remove the chops from the marinade, shaking off excess, and grill until browned, the meat is no longer pink inside, and the meat shows good grill marks, 5 to 8 minutes per side. Brush several times with marinade and let the marinade cook onto the surface of the meat. Discard excess marinade. While the meat is grilling, place 4 pineapple rings onto the grill, and allow to cook until hot and the slices show grill marks; serve the chops topped with the grilled pineapple rings.

Tuesday, August 6, 2013

Buffalo Wings

These are so easy-peasy that I'm almost embarrassed to share the recipe.  This is one of those recipes though that is all about the ingredients.  You have to buy Franks Red Hot Buffalo Sauce, not Franks Red Hot Sauce, or another similar brand.  Has to be Franks Red Hot Buffalo Sauce.  Served with Lighthouse Big Blue Cheese Dressing and some celery and you have one heck of an appetizer.  This is also best served immediately too.  The longer the sit, the drier they get, and no one likes a dry wing.  Has to be hot and saucy ;)


1 lbs Chicken Wings - make sure you cut the tips of the wings off (discard) and then separate the wing part from the shoulder part of the wing (you will use both)

1 cup Franks Red Hot Buffalo Sauce - more or less depending on how saucy you like it

1 quart Canola/Veggie Oil

Blue Cheese, Ranch, and Celery for sides :)


In an 8 qt stock pot, heat the oil to 375 degrees.  The end temperature should even out to be 350 degrees, so if you have a fryer set it to 350, if not set it to 375 and then when you add the cold wings, it should cool to around 350.  Cook the wings for 10 minutes and add to a big metal bowl.  Pour the sauce over the top and then toss the wings until they are fully coated.  Serve IMMEDIATELY!!  Sooooo good!!!

Spinach Artichoke Dip

I have made quite a few spinach artichoke dip recipes in my day, and there is always something a bit "off."  Either the dip is too salty, not cheesey enough, no flavor, too vinegary...etc.. This dip seems to be the perfect balance of spinach, artichoke, and cheese.  It is a recipe from my sister in law Kellie who is a fabulous cook.  When Jana made it for my dad's birthday, Curtis did not believe that it was homemade...he demanded that we tell him what store/restaurant it was from so that he could go buy more.  It was too funny!

1 c  artichoke, roughly chopped
1/2 c frozen spinach defrosted. (You can use fresh spinach, 3 cups, then steam)
1 c water
1-8 oz. cream cheese
1/2 tsp. red pepper flakes (more or less to taste)
1/4 tsp. salt
1/8 tsp. garlic powder
3/4 cup parmesan cheese, divided
Dippers: Tortilla chips, Baguettes, Crackers, Veggies, etc...

Boil artichokes and spinach for10 min.  Drain and place in a bowl.  Warm cream cheese in the microwave and add to the spinach/artichoke mixture.  Add rest of seasons and 1/2 cup of parmesan cheese.  Spread in a 8x8 baking dish and top with remaining 1/4 cup parmesan cheese.  Put under broiler until the cheese is golden brown.  Serve immediately.

Friday, April 12, 2013

Nutty Tilapia with Mango Salsa

Tonight was one of those nights where at 4:45 I thought "crap...TJ will be home in 15 and I have no dinner!" While I have a very accommodating and go with the flow husband, I do like to have a meal on the table when he gets home around 5:30ish.  Well instead of freaking out (okay maybe there was a little of that), I looked in my fridge and saw that I had leftover tilapia and mango salsa from last nights fish tacos, as well as some almonds and coconut that were dying to be utilized in some way, shape, or form.

Any who...I decided to make a toasted coconut and almond crusted tilapia and top it with the mango salsa.  It was AMAZING!!  The sweet, tanginess from the mango salsa paired with the crunchy, sweet crusted tilapia was simply delicious.  It was thrown together in moments and tasted as though it was on purpose :)  LOVE these types of meals!!!


4 tilapia pieces
1/2 cup sweetened coconut
1/2 cup crushed almonds
lemon pepper
salt

1 large mango, chopped
1/2 red onion, chopped
1/2 bunch cilantro, chopped
1/2 lime
salt and pepper to taste

In a large skillet over medium heat, toast the coconut and almonds until they are a beautiful brown.  Take the tilapia pieces and generously coat with the lemon pepper and salt.  Coat with coconut and almonds.  Bake at 350 degrees for 15-20 minutes or until the fish flakes and is no longer translucent in color.

Mix the mango, red onion, cilantro, and lime.  Add salt and pepper a little at a time with tasting after each addition.  These should be used as a flavor enhancer, not flavor take over...This is easy to do!

When the tilapia comes out of the oven, top with mango salsa and serve immediately!  Enjoy!!!

Thursday, January 17, 2013

Cashew Mango Chicken

So in an attempt to lose a bit of weight before the much awaited pregnancy of baby #2 happens, I have decided to do a diet with my mom, Brandi, and Leann.  It is a diet based around the idea of small meals that are perfectly portioned, along with exercise, and drinking a TON of water!  It is a really great way to loose weight, feel great, and get healthy.  The next few meals I post will not only be delicious, but also align perfectly with the Game On! Diet.


1 small can chicken stock (low sodium)
12 cashews, crushed
3 palm size chicken breast (boneless, skinless)
Paprika
Crushed red pepper
salt and pepper

2 mangoes, diced
1 cucumber, diced
1/2 red onion, diced
1 bunch of cilantro, chopped
1 squeeze of lime juice

Soak chicken breasts in chicken stock and then lightly bread with the crushed cashews (if you are not doing the Game On! Diet, then I would add about 1/2 cup of panko bread crumbs to the crushed cashews).  Place on a lightly greased (with cooking spray) cookie sheet.  Bake at 350 degrees for 30-35 minutes or until the chicken is cooked all the way through.

While the chicken is cooking, add all your diced fruits and vegetables together.  Add lime juice and salt and pepper to taste.

To assemble, jut put  a fist sized portion of mango salsa over the top of your cashew chicken...and enjoy!!! Diet or not, this is a delicious meal that is both sweet and savory!!!  Serves 3

Cherry Cross Over Bread

This is a recipe that I have been trying to get for almost 20 years.  My family had a home teacher growing up that would come once a year and bring my family this bread.  It was much awaited, and devoured in merely a few minutes.  Best. Home. Teacher. Ever!!!  His wife would never divulge the recipe because it was her family secret recipe.  So...low an behold...all I had to do was move clear across the country for her to finally relent and give it to me :)

So here it is...the most delicious cherry cross over bread that will ever grace your taste buds!  It is so delicious that you can only eat it once a year!  That way you have a year to burn off all the calories...just in time to eat it again!!!!

Bread: (you can also use frozen bread dough if you would like to make life a bit easier...you will sacrafice a bit of flavor...but the end product is still delicious)
1/4 c warm water
1 c milk
1/4 c sugar
1 1/2 T instant yeast
3/4 c butter, softened
1 tsp salt
4 1/2 c flour

Filling:
1 (8oz) pkg cream cheese
1/4 c sugar
1 (1 lb) can cherry pie filling
1 tsp almond extract

Icing:
1 T butter, softened
1 c. powdered sugar
1/2 tsp vanilla
1 to 2 T milk


Place first 4 bread ingredients in a stand mixer and allow to sit until it becomes foamy (about 10 minutes).  Add butter and dry ingredients and mix well.  Dough should be slightly sticky but pull away from the bowl easily.  When dough is ready, divide dough in half or fourths depending on the size of crossover you want.

Roll each section out separately into an 8 x 15 rectangle.  Place on a long cookie sheet covered with tin foil.  Make 3-inch vertical cuts 1 inch apart on the long sides, leaving 4-inch center of each rectangle.  Top with cream cheese mixture (cream cheese and sugar) and mixture of pie filling (mixed with almond extract).  Fold strips gently from each side of the rectangle, over the filling, crisscrossing them to give a braided look.  Don't pull too hard on the strips.  You just need to cover the end of the strip before.

Let dough rise for about 30 minutes, or until the desired size is reached.  Bake at 350 degrees for 20 minutes, until golden brown.  Drizzle with icing, and garnish with nuts (optional).